
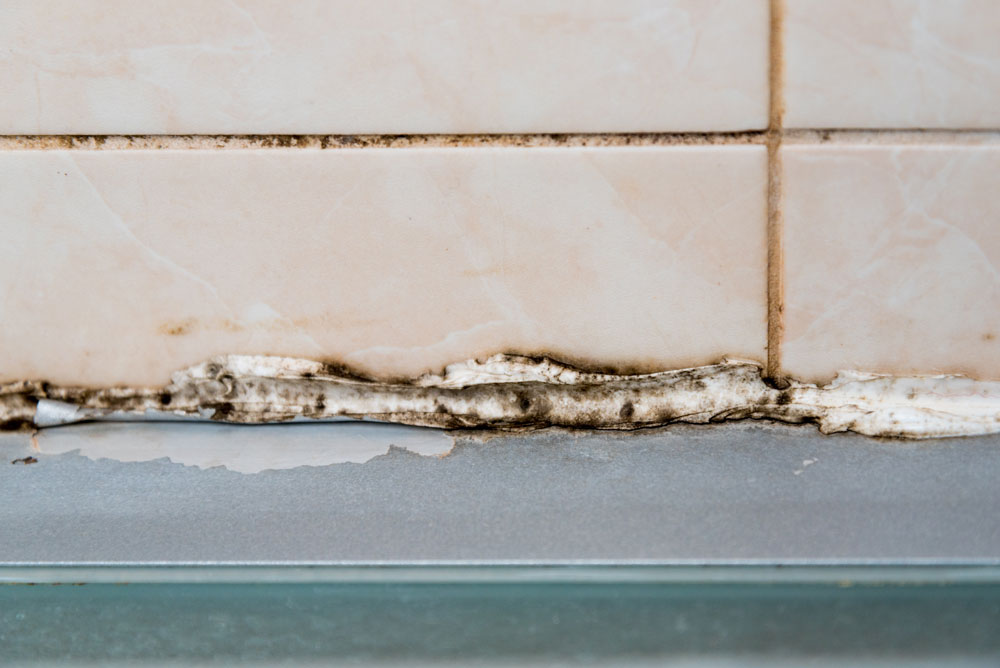
Bathroom grout is used to seal the edges of shower enclosures, bathtubs, and sinks to prevent water leakage, but over time, it can turn black. This discoloration is usually caused by mold, which thrives in damp environments. The warm, humid environment of a bathroom provides an ideal breeding ground for these small fungi. Although black grout looks unsightly, it indicates that moisture is trapped within the joints, which can damage walls or sanitary fixtures if not addressed quickly. Regular cleaning helps, but sometimes simply scraping is not enough to completely remove the black spots, as the mold may have penetrated deep into the grout.
If the grout absorbs moisture over time, it can be difficult to remove the black spots without proper treatment. To prevent the mold from spreading to other parts of the bathroom, action must be taken as soon as possible. The best way to slow down the discoloration process is to ensure optimal air circulation and wipe surfaces dry after use. This is especially noticeable where water can accumulate, such as in bathtub corners, sink edges, or toilet bases. The first step to making your bathroom clean and safe again and keeping your sanitary fixtures looking like new for years to come is understanding why bathroom grout turns black.
Causes of Black Caulk in Bathrooms
The main cause of blackening bathroom grout is moisture and high temperatures, which create an ideal environment for mold growth. Even minor leaks, steam from hot showers, or condensation can eventually promote mold growth. Poor ventilation exacerbates the problem, as stagnant air causes moisture to remain on surfaces for hours or even days. Soap residue, body oils, and hair also accumulate in the grout, causing it to turn black faster and allowing mold spores to feed on it.
Grout is more susceptible to staining than other types of grout, especially older silicone or latex grout that may have lost its moisture-resistant properties. High water hardness or mineral deposits can also cause stains, making black spots more noticeable. Regular cleaning is also crucial. Grout residue on tiles or mirrors is often overlooked, allowing mold to grow unnoticed. Even in bathrooms that people do not use frequently, constantly high humidity can turn grout black. By understanding the causes, homeowners can take preventative measures, such as improving air circulation or replacing the grout with a less corrosion-resistant variety, thereby reducing the likelihood of the problem recurring.
How to Safely Remove Black Grout
Removing black grout requires patience and skill to avoid damaging bathroom surfaces. First, use a grout remover or a plastic scraper to carefully scrape the old grout from the edges of tiles, bathtubs, or sinks. Never use metal tools, as this can cause scratches on the surface. After you have removed most of the grout, thoroughly clean the area with a little soapy water to remove any remaining residue. For stubborn black stains caused by mold, you can use a mixture of vinegar and water or a mild household cleaning agent. Apply the solution, let it sit for a few minutes, and then gently scrub with a soft brush.
Clean thoroughly, rinse completely, and allow to dry fully. New grout does not adhere to damp surfaces. If the black grout has been in place for months, it may have seeped into the surrounding tile joints or tiles. Therefore, extra caution is required: ensure the surface is thoroughly cleaned before applying the new grout. Wear gloves and ensure good ventilation while working. This is a sensible safety measure. By following these steps correctly, you will achieve a clean surface, ready to apply more durable new grout in your bathroom, without using toxic chemicals or damaging fixtures.
Choosing and Applying New Grout
When replacing grout that has turned black, always use a product suitable for damp environments. Choose silicone- or mold-resistant grout, which not only prevents mold growth but also remains flexible for a long time. Ensure the work area is completely dry and remove all residue. Apply masking tape along the edges to create tight, straight lines for the new grout. Cut a small angled piece off the tip of the grout tube to limit flow, and then apply the grout evenly to the joints, pressing gently to fill the gaps.
Smooth the grout with your fingers or a grout spatula to remove air bubbles and ensure an even seal. Allow the grout to cure according to the manufacturer’s instructions, usually for 24 hours. During this time, the grout must not come into contact with water. When used correctly, no water will seep under the tiles or fixtures, preventing the grout from turning black. After curing, wipe the surface clean regularly and repair any leaks immediately to keep the grout in good condition. Regular inspection and cleaning extend the lifespan of your bathroom grout and keep your bathroom fresh and clean, preventing mold growth.
Preventing Black Caulk in the Future
The key to preventing black and moldy bathroom grout is controlling humidity and maintaining good hygiene. Ensure good ventilation. Always use an extractor fan while showering. Open doors and windows as much as possible to promote air circulation. Methods to prevent mold growth include removing water from edges and corners and wiping down damp surfaces. Using mold-resistant grout when applying or replacing grout offers additional protection. Avoid placing damp towels or bath mats near the grout.
Clean the grout regularly with a mild soap or vinegar solution to ensure it remains clean and dust-free. Using a dehumidifier or implementing air circulation measures to maintain stable humidity in the bathroom can be very effective. Even small preventative measures, such as drying the bath immediately after use or leaving the shower curtain and doors open, can have a cumulative effect. Regular maintenance can ensure that grout remains clean, safe, and beautiful for years, reducing the need for replacement or thorough cleaning. Simple daily care helps prevent diseases caused by mold growth in the bathroom.
FAQs
1. What causes black mold in bathroom grout?
Mold and fungi can cause bathroom grout to turn black because they thrive in damp, warm, and poorly ventilated environments. Soap residue and body oils can also cause discoloration of the grout.
2. How do I remove black grout?
Light-colored black spots can be cleaned with a vinegar solution or a mild household cleaner, but if the mold has penetrated deeply, the grout usually needs to be removed and replaced.
3. Is silicone grout or latex grout better for the bathroom?
Silicone grout is more waterproof and mold-resistant, making it ideal for bathrooms. However, latex grout can discolor and fade if exposed to high humidity for extended periods.
4. How long do new bathroom grouts last?
Properly applied silicone or mold-resistant grouts can last 5 to 10 years, depending on the humidity in the bathroom, maintenance, and usage.
5. How do I effectively remove black grout?
Use a plastic scraper or a grout removal tool. Clean the surface with mild soap or vinegar. Ensure the surface is dry before applying new grout. Do not use corrosive chemicals that could damage the tiles or fixtures.

Elena Rodriguez is a certified home inspector and DIY educator specializing in maintenance routines, home repairs, decor optimization, office setup, and smart device integration. She helps homeowners tackle projects with confidence using tools they already own. Her writing focuses on actionable steps for cleaning, fixing, arranging, and automating. Elena holds a degree in Construction Management and contributes to home improvement resources regularly.