
A torn insect screen may seem insignificant, but it can cause countless inconveniences in daily life. Even a small tear can let flies, mosquitoes, dust, leaves, and other debris into the house. Even if the window frame is intact, a loose or torn screen can make it look old and dated. Fortunately, with patience and the right methods, most beginners can replace a torn screen themselves.
You do not need a professional to repair a torn screen. Usually, you only need some simple tools, a roll of new screen, and a little care during the reinstallation. This simple way to repair screens can save you money and effort and give your windows a fresh, new look.
Why Replacing a Broken Window Screen Matters
Window screens do much more than just keep pests out. They also ensure air circulation and prevent insects and dirt from entering your home. Even a small hole in a screen can grow larger over time if pets, children, or strong winds constantly compress it. A small tear can eventually cause the screen to sag and become unusable.
Replacing damaged window screens ensures your home looks better. Clean, tightly stretched screens give windows a neat and attractive appearance. When preparing a home for guests, renters, or buyers, a few small repairs can make a big difference. This simple maintenance can make your living environment cleaner, fresher, and more comfortable.
Signs that your Window Screens Need Replacing
Occasionally a small repair is sufficient to fix a window screen, but sometimes replacement is the best option. A patch repair can temporarily seal small holes in the screen. If the screen has multiple holes, large tears, loose edges, or is warped, it is advisable to replace it for a cleaner and more durable result. If your insect screen is fragile, discolored, brittle, or shows splinters, replace it. Sunlight, rain, dust, and daily use can damage old insect screens. If the screen tears easily, repairing a hole will not help. Installing new mesh is better, as this provides a fresher and stronger surface for your window.
Tools and Materials Required
Before repairing damaged insect screen mesh, you should have all the necessary tools and materials ready. You typically need a roll of insect screen mesh, a mounting roller, a new mounting strip (if damaged), scissors or a utility knife, a flathead screwdriver, and a clean work surface. The mounting strip is a rubber cord used to hold the insect screen mesh in the grooves of the frame.
Choosing the right insect screen mesh is important. Fiberglass screens are popular due to their flexibility and ease of use. Aluminum screens are stronger, but they bend or wrinkle more easily if handled with force. Thicker insect screens for protection against pets are better suited for households with cats and dogs but require more force during installation. We recommend using fiberglass screens for most simple screen replacements, as they are easy to work with and readily available.
Carefully Remove the Screen Frame
The screen frame must be removed first. Depending on the type of window, screens can usually be lifted, slid, or flipped up. Take your time – old frames can bend if too much force is applied. Use the screen’s pull rings carefully. If the screen jams, check the edges and rails for dirt, paint residue, or pressure marks.
After removing the frame, place it on a table, the floor, or a workbench. A flat surface helps stabilize the frame while removing and replacing the screen. Carefully straighten the frame first before replacing the screen. Even if the screen is installed correctly, a severely bent frame can make the new screen look loose or uneven.
Removing the Old Mesh
After leveling the frame, locate the mounting strip for the mesh. This strip is situated in the locking groove of the mesh. Use a flathead screwdriver to pry one end of the mounting strip loose. Then, carefully remove the strip with your fingers. Old or damaged mounting strips can break, so be patient.
After removing the mounting strip, the old mesh should come off easily. Discard the damaged mesh and clean the frame’s locking groove before proceeding. Dust, small stones, old rubber residue, and dirt can easily accumulate in the locking groove, making the installation of the new mesh more difficult. Gently wiping the groove with a cloth will make the installation smoother and ensure the new mounting strip fits better into the frame.
Measuring and Cutting the New Mesh
Place the new mesh on the frame, ensuring it completely covers the opening and that there is excess material on both sides. Do not cut too close to the frame. Leave a few centimeters of clearance at the edges to allow for tightening and adjusting the mesh during installation. Cutting too small is a common mistake among beginners.
After laying the mesh on the frame, check that it lies flat. The stitching of the mesh must not be crooked; it must run evenly across the entire frame. Although this step may seem unimportant, it has a major impact on the final result. A crooked mesh can still work, but it looks messy both inside and out. Take a moment to lay the mesh properly so that it looks more professional.
Installing a New Mesh with a Pressure Strip
Now use the pressure strip and rollers to press the mesh into the grooves of the frame. Place the pressure strip over the mesh in the groove on one side of the frame. Slowly press down the pressure strip with the rollers. Apply light pressure to the mesh, but do not bend or stretch the frame. After securing the first mesh, proceed to the other side and install the mesh along the edge of the frame. The mesh should sit flat and firmly, but not too tight. Too loose, and it will look fragile. If it is too tight, the frame may warp. The replacement screen must be flat, clean, and even. If you make a mistake, lift the protective strip and try again before cutting off the excess mesh.
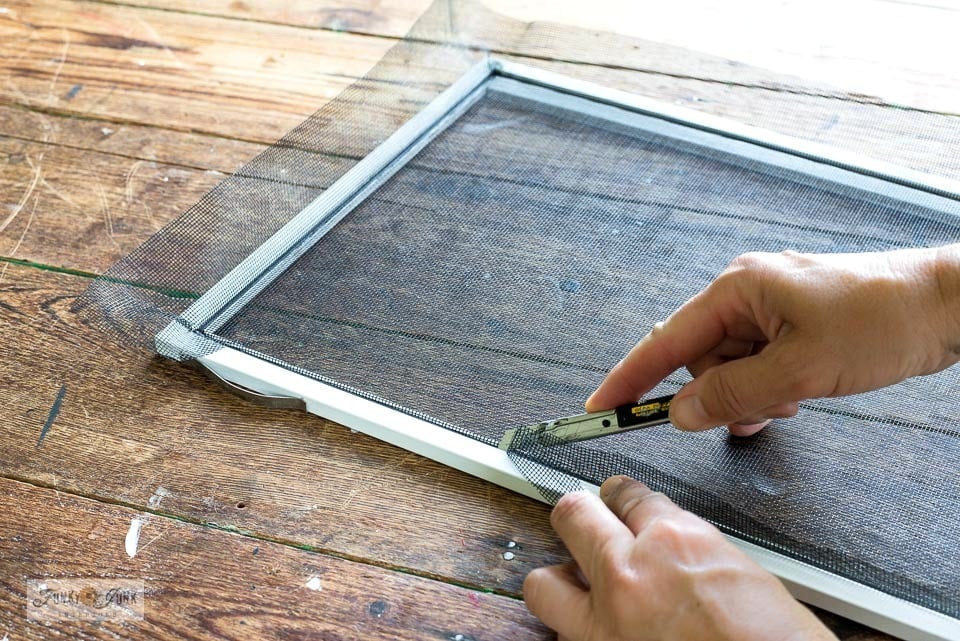
Cutting off Excess Mesh
After pressing the protective strip into the groove, check that the screen is installed correctly. Check for wrinkles, loose parts, or crooked lines. If everything is in order, use a sharp utility knife or scissors to cut off the excess mesh along the outer edge of the protective strip. Be careful to avoid accidentally cutting into the new mesh.
A neat finish ensures the screen looks better. While cutting, keep the knife away from the mesh to prevent it from slipping and damaging the new mesh. After cutting, gently press the edge with your fingertips to ensure the protective strip is securely attached and that no mesh fragments are loose. The correctly installed screen looks like new.
Reinstalling the Screen
After you have installed the new screen and cut it to size, place the screen frame back into the window. Ensure that the screen frame sits firmly in the rail. Do not force it in. Check that the screen frame is properly aligned and that the corners fit together correctly. Screens with clips or spring clips can only be mounted in one way.
To check if the screen is working properly, gently open and close the window after replacing the screen. Examine both the inside and the outside of the screen. The screen should lie flat, completely cover the window frame, and be held securely in place when the window is moved. If one side comes loose, remove the frame and check if the clamps are fully pressed in.
Common Mistakes and How to Avoid Them
Tightening the insect screen too much is a common mistake. Many people like their screen to be taut, but excessive tension can warp the frame, making reinstallation difficult. Insect screens must remain taut and not be rolled up straight like a roll. If the frame curves inwards, the screen can become too tightly tensioned when rolling it up into the frame trim.
Reusing dry, cracked, or weak frame trims is another mistake. If the trim is not strong enough, the new screen may slide off. The correct size of the trim is also crucial. A trim that is too narrow may not hold the screen properly, while a trim that is too thick will be difficult to fit into the frame. If you are unsure of the size, take a small piece of the old trim to a hardware store for comparison.
Extend the Lifespan of a New Insect Screen
Simple maintenance can extend the lifespan of a new insect screen. Do not press on the screen when opening or closing the window. Use the window handle or the frame instead. The purpose of a screen is to prevent insects and dirt from entering, not to withstand the pressure of people, pets, or objects. Constant pressure can loosen even sturdy screens.
Gently cleaning screens also helps. Use a soft brush or a vacuum cleaner attachment to remove dust. Clean the screen with a damp cloth and mild soap, then dry it. Vigorous scrubbing can damage or pull the screen loose. Regular and gentle cleaning ensures that screens continue to look like new and improves air circulation.
Conclusion
Replacement of a damaged window screen is a simple home repair that may improve comfort, cleanliness, and insect protection. Without sophisticated expertise, you can do it well. With a spline roller, the correct screen mesh, and a meticulous step-by-step approach, you can confidently remove the old mesh, install the new screen, and return the frame to the window.
Work gently, keep the mesh straight, don’t pull it too tight, and make sure the spline fits in the groove. Fixing a damaged window screen is easier once you know how. This practical skill saves money, enhances your home’s look, and lets you enjoy fresh air without mosquitoes and trash.
FAQs
1. Can I change window screens myself?
Many people can replace window screens with minimal equipment and patience. Understanding how the mesh and spline fit into the frame simplifies the process. Replacement of ripped screen mesh is easy for beginners if the frame is intact.
2. What screen mesh is ideal for beginners?
Fiberglass screen mesh is flexible, quick to cut, and easier to install than metal mesh, making it ideal for novices. It suits most ordinary windows. You may need stronger pet-resistant mesh if your pets scratch or push screens.
3. Must I rebuild the spline every time?
Replacement is recommended if the spline is cracked, dry, strained, or broken. A weak spline may loosen the new screen. You can reuse an old spline if it fits well and is flexible.
4. My new screen seems loose—why?
A new screen may seem loose if the mesh was not held uniformly during spline installation. If the spline is too tiny for the groove, it might happen. Reinstall the mesh with tighter tension to keep it smooth throughout the frame after removing the spline.
5. Can I repair a little hole instead of replacing the screen?
Patching a minor hole is possible if the screen is still robust. Replacement is best if the screen has several holes, a lengthy rip, or poor mesh. Full-screen replacements are cleaner and last longer than patches.

Elena Rodriguez is a certified home inspector and DIY educator specializing in maintenance routines, home repairs, decor optimization, office setup, and smart device integration. She helps homeowners tackle projects with confidence using tools they already own. Her writing focuses on actionable steps for cleaning, fixing, arranging, and automating. Elena holds a degree in Construction Management and contributes to home improvement resources regularly.